OmniUpdate Training
Uploading, Inserting and Publishing Images
|
After selecting an image based on dimensions requirements for your image placement, you will upload the image file into your website's image folder. You can resize the image with an external photo editor — such as Photoshop — before the upload, or edit it after the upload with the OU Campus Edit Image tool. For an overview of the steps to take, watch the OmniUpdate video on Uploading Binary Files. IMPORTANT NOTE: You will upload the images to your website images folder. Disregard the video section between :50 and 1:25, as the images folders have already been created |
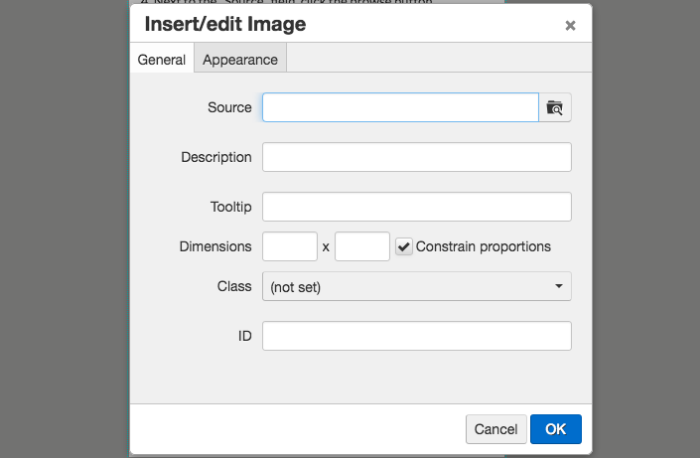
Quick Steps—Insert/Edit an Image
- OPEN an editable region.
- SELECT the Insert/Edit Image icon from the JustEdit toolbar.
- SELECT the General tab at the top of the Insert/Edit Image box.

- Next to the "Source" field, CLICK the browse button.
- NAVIGATE through the OU Campus folder structure and select the appropriate image. (You should automatically be directed to your website's image folder.)
- CLICK "Insert" in the bottom right corner of the Select Image box.
- ADD a "Description"; this field is used as the alt text for the image.
- ADD a "Tooltip," and SELECT a "Class" (if available).
- SELECT the Appearance tab at the top of the Insert/Edit Image box to make adjustments to the image's appearance on the page.
- ADJUST the "Alignment," "Vertical space," "Horizontal space," "Border width," and "Style" as needed.
- CLICK OK in the bottom right of the box.
- To reopen and edit the image, select the image and click on the Insert/Edit Image icon from the toolbar.
OmniUpdate Support ResourcesOU Campus Basic Training Video Quick Reference Guide (910 KB, 8 Pages) The basic training video is general to the OU Campus interface and will be useful as an overview. Please see training pages on the left menu for steps specific to the Foothill College OU Campus environment, specifically how to log In, image dimensions and more. |

